-->

music

Followers

time

Thursday 22 August 2019

how to edit a poster by uisng mobile and pc


hello and assalamuakum , today i wll give you some tutorial usimg these softwre :

                                                              
Hasil carian imej untuk picsart logo

                                               1) picsart


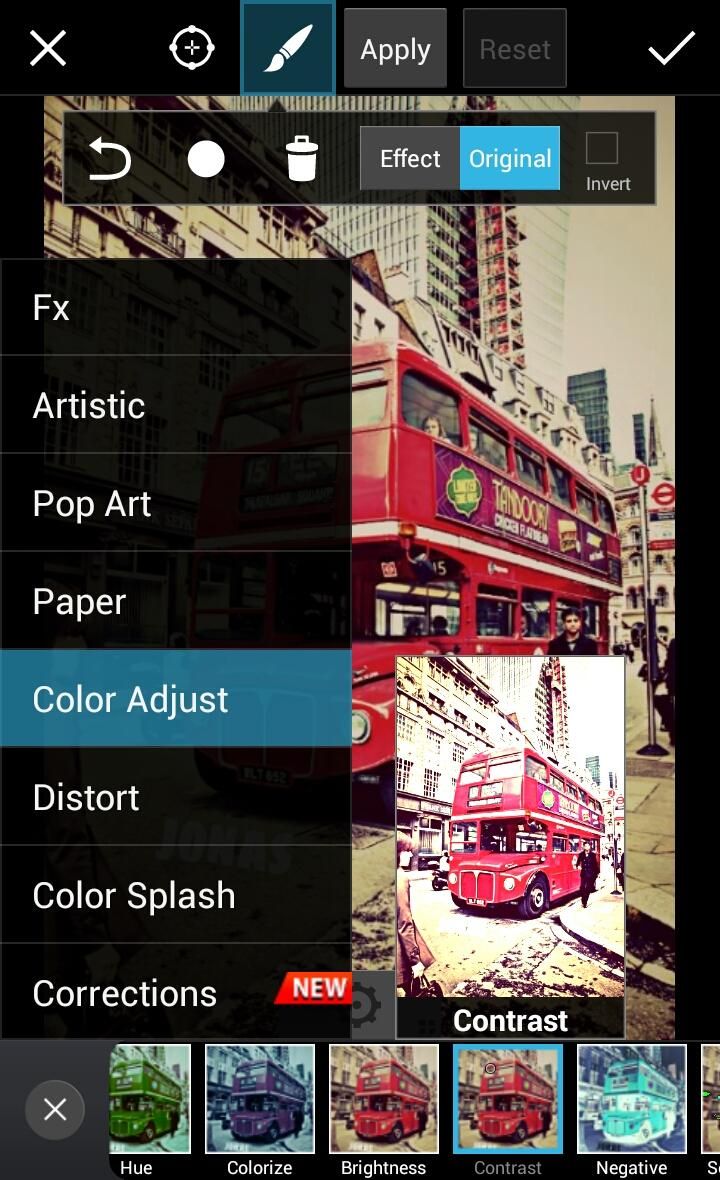
                                   Step 1: Adjust the image contrast.

Open up your chosen image and adjust the contrast to improve the look of the poster effect. Select “Effects” from the toolbar at the bottom of the screen and select “Color Adjust>Contrast”. Adjust the slider until you are happy with the results.


poster effect

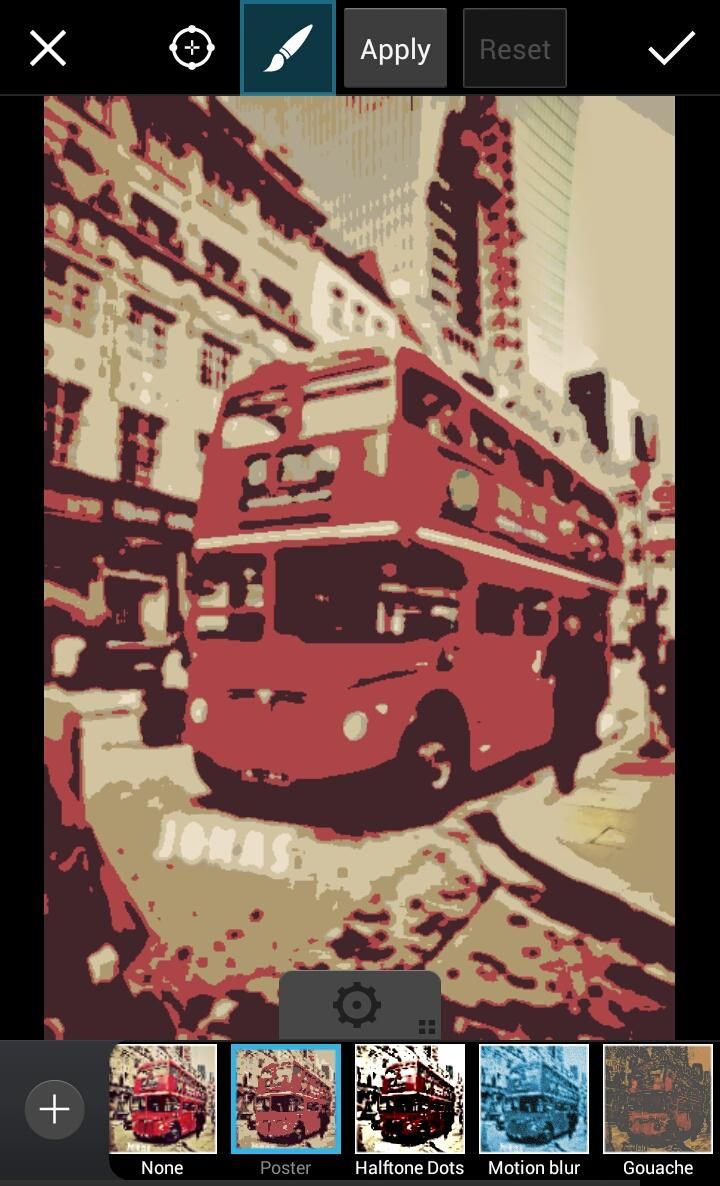
                                    Step 2: Add the poster effect.

Now go to “Effects>Artistic” and select “Poster”.

poster effect tutorial


poster effect tutorial


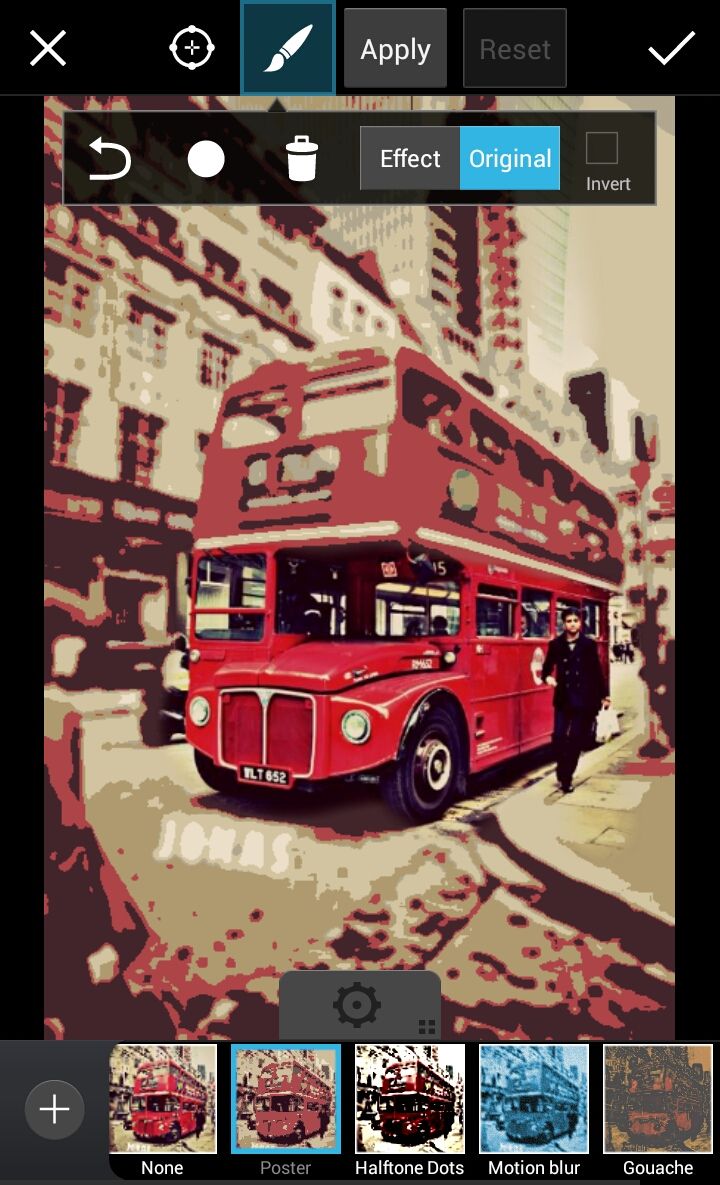
Step 3: Brush out the photo effect.

When you have applied the poster effect, you can then experiment with adjusting the sliders to control how your shot will look. You can also use the brush to scrub out the poster effect in certain areas, creating an image that mixes the effect and your original photo.


poster effect tutorial


Hasil carian imej untuk photoshop logo

 photoshop 


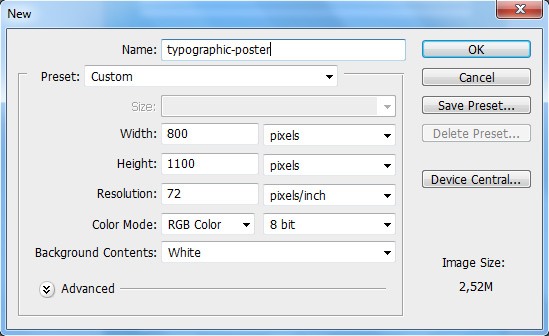
Step 1: Create the Photoshop Document

Let’s start by creating a new document. Press Ctrl/Cmd + N and set the document size to 800x1100px with a white background.

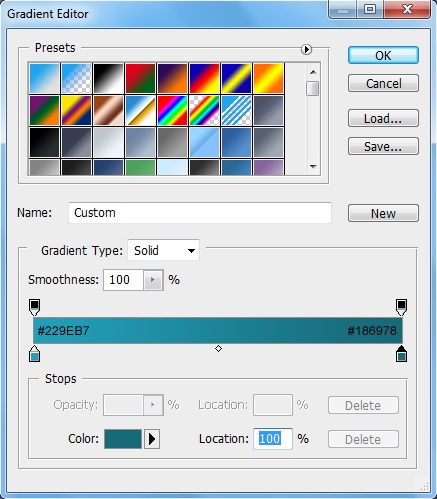
Step 2: Create the Blue Gradient Background

Double-click on the Background layer to unlock it. Choose the Gradient Tool (G) and set the gradient colors to #229EB7 and #186978.

Step 3: Add Texture to the Blue Background

Now go to the High-Resolution Grungy Paper Textures download page on Six Revisions and then download the first texture called Grungy Paper 01. Open it in Photoshop and, using the Move Tool (V), drag it into our main document

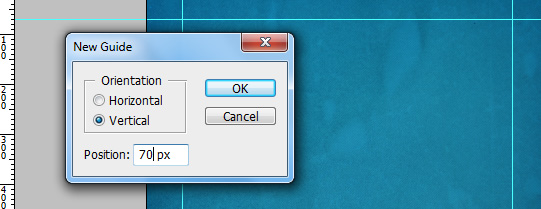
Step 4: Adding Photoshop Guides

When working with design layouts, and especially those that involve text blocks, Photoshop guides will help you by making it easier to align your design components.
Let’s add 4 guides. To add a guide, you can go to View > New Guide.

Step 5: Add Some Text to the Poster


Hasil carian imej untuk snapseed logo
snapseed 
STEP 1 :

Open SnapSeed Application And Select Your Silhouette Picture In SnapSeed 

STEP 2 :

First You Have To Select"White Balance" Option


Increase Temperature....
Because It Increases The Sunset Colour..


STEP 3 :

Major Part Is U Have To Know How To Use Tune Image Option...So I Explain..How To Use Tune Image Option...
Select " Tune Image" Option


Select Saturation Option


increase Saturation..This Is Your Choice... Increase The Saturation To Your Need..
Im Increasing My Saturation To  100 Which Is Good For My Silhouette

then Select"Shadows" Option..And Reduce Shadow Level.....
So It Reduces The Shadow Level...I Mean Black Colour...
It's A Too Useful Option To Reduce Shadows...


then Select. " Warmth" Option...And Increase The Level Of Warmth...
So This One Increases The Warmth Colour Like Orange,Red,Sunset Colour...


then Select The "Contrast" Option..If It Is Necessary....
Increase Or Reduce...Its Your Choice....
For My Self Im Increasing Contrast To  11
STEP 4 :

Tap On Selective Option...
And Increase Or Reduce The Colours..
Now Im Reducing The Clouds Black Colour To -12


So Finally My poster Is Ready .... just fill in the text 
                             so Friends...I Hope This Is A Useful Tutorial For You..

                             Give Your Valuable Comments In Comment Section


Hasil carian imej untuk canva logo

canva 


How to make a poster

  1. step 1
  2. Get the right size. With Canva, this couldn’t be easier—we have standard poster sizes preset to make it simple.


  3. step 2
  4. Choose a poster template, or design your poster from scratch. Canva has thousands of templates to choose from! Select a design that suits the message you’re trying to get across.


  5. step 3
  6. Customize your poster. Add your own images or one from our stock library (we have millions to choose from). Change the colors and fonts to suit your needs.

  1.                        
  2. .


                                        Hasil carian imej untuk spark adobe

                                                      spark adobe 

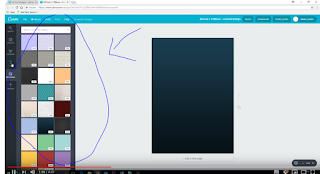
  1. Step 1: Select Your Size

    Before you start designing your poster, first you’ll need to choose how big you want your poster to be!
    . At the bottom on your screen, you’ll see a list of different sizes you can create.
  2. Step 2: Select Your Image And Texts

    This is probably the most important part of designing your poster.
    Your images and the words you use on your poster are what will convince people to stop what they’re doing and read!
    To pick a background image, click “Background” followed by “Replace Photo.
  3. Step 3: Share Your Poster 

    Now that you’ve created the size, texts, and images on your poster, it’s time to put it out there!
    You can download your poster, print it out and hang it on the walls, or put it on social media

Monday 19 August 2019


today , i learn how to create my own video . so this the trial video by using "bitable" website. The way to use this apps is :

1; log in your google aaccount
2: pick what theme do you like 
3: design your animation video by using your own creativity 


Thursday 8 August 2019

script & storyboard

Time
Script
Roles
Location
Remarks


00:00 – 00:20
Assalamualaikum W.B.T harini saya md hamdan bersama ahli kumpulan saya iaitu mohd fikri & zaharif akan membincangkan tentang hari raya aidiladha dan ibadah korban

fikri  
Amdan
Zaharif  


Rumah

Music instrument


00:20 – 00:27

Hari Raya AIdiladha dan ibadah korban


Tajuk hari raya dan ibadah korban


00:27 – 01:36
Hari Raya Aidiladha : عيد الأضحى 'Eid Ul-Adha), Hari Raya Korban atau Hari Raya Haji merupakan perayaan yang dirayakan oleh umat Islam di seluruh dunia. Perayaan ini merupakan perayaan terbesar di dalam Islam selain Aidilfitri. Aidiladha disambut pada hari ke-10, ke-11, ke-12 dan ke-13 bulan Zulhijjah setiap tahun. Aidiladha ialah perayaan yang istimewa kerana ia merupakan hari untuk umat Islam memperingati kisah pengorbanan Nabi Ibrahim a.s. dalam menunaikan perintah Allah dan kesabaran anaknya Nabi Ismail a.s. dalam memenuhi perintah Allah SWT. Dari segi bahasa, korban bermaksud dekat, manakala dari segi istilah ia bermaksud menjalankan perintah agama atau taat kepada perintah Allah kerana ingin mendekatkan diri kepada-Nya.

Hari Raya Korban jatuh pada hari kesepuluh pada bulan Zulhijjah, bulan terakhir dalam kalendar Hijrah Islam. 10 Zulhijjah merupakan tarikh penting dalam sejarah Islam kerana Nabi Adam dan isterinya Hawa dikeluarkan dari syurga dan diturunkan ke bumi sebelum berjumpa di padang Arafah, di luar bandar Mekah.


Amdan
Zaharif
Masjid

Music instrument background


01:36 – 02:06
Scenery

masjid
Music instrument


02:06 – 02:11
Okay sekarang ini kita akan menuju ke tempat penyembelihan lembu  
Fikri

Masjid

Music instrument


02:11 – 02:31
Scenery

Tempat penyembelihan lembu
Music instrument


02:31 – 03:11
Memotong seluruh halqum(saluran nafas) dan seluruh marih (saluran makanan dan minuman).Niat untuk menyembelih ketika melakukan penyembelihan.Jika seseorang memegang pisau di tangannya dan terlepas pisau itu daripada tangannya, lalu terkena leher binatang dan terputus seluruh halqum dan marihnya, tidaklah dikira sebagai penyembelihan, kerana tidak ada niat untuk melakukan penyembelihan, maka tidak halal memakan daging binatang tersebut.Hendaklah binatang itu mati semata-mata disebabkan oleh penyembelihan (tidak dilakukan satu perbuatan lain yang boleh membawa maut kepada binatang itu ketika disembelih).lain yang boleh membawa maut kepada binatang itu ketika disembelih).

Fikri
Tempat penyembelihan
Music instrument background


03:11-03:31
Okay kita telah sampai ke hujung rancangan kami . Jika kami ada tersilap Bahasa harap diampun. Saya mewakili ahli kumpulan saya ingin mengucapkan selamat hari raya aidiladha  
 Hamdan
Masjid


03:31 -  03:41
 Credit


Music instrument


Thursday 1 August 2019

5 widget

INSTAGRAM BUTTON DI BLOG


1. Sign in blogger > Design > Add Gadget > Html/JavaScript

2. Copy code di bawah dan paste ke dalam Html/Java Script 

<style>.ig-b- { display: inline-block; }
.ig-b- img { visibility: hidden; }
.ig-b-:hover { background-position: 0 -60px; } .ig-b-:active { background-position: 0 -120px; }
.ig-b-48 { width: 48px; height: 48px; background: url(//badges.instagram.com/static/images/ig-badge-sprite-48.png) no-repeat 0 0; }
@media only screen and (-webkit-min-device-pixel-ratio: 2), only screen and (min--moz-device-pixel-ratio: 2), only screen and (-o-min-device-pixel-ratio: 2 / 1), only screen and (min-device-pixel-ratio: 2), only screen and (min-resolution: 192dpi), only screen and (min-resolution: 2dppx) {
.ig-b-48 { background-image: url(//badges.instagram.com/static/images/ig-badge-sprite-48@2x.png); background-size: 60px 178px; } }</style>
<a href="http://instagram.com/amdxnnn?ref=badge" class="ig-b- ig-b-48"><img src="//badges.instagram.com/static/images/ig-badge-48.png" alt="Instagram" /></a>


*nama id perlu ditukar


kita boleh letak di side bar seperti saya
anda boleh follow saya di instagram untuk mengikuti perkembangan saya 


waktu jam DI BLOG

1. pergi ke link di bawah 
2. pilih design
3. seteresunya tekan accept
4. pilih masa mengikut negara atau tempat 
5. kemudian copy link 
6. pergi ke layout kemudian pilih add a gadget dan pilih html dan akhir sekali paste link
jam ini berfungsi supaya pembaca dapat memudahkan pembaca mengetahui waktu

facebook DI BLOG

1.Login ke Blogspot, clik Layout > Add a Gadget (Sidebar)  >  HTML/JavaScript 

2. Copy code di bawah dan paste ke dalam Html/Java Script

<a href="https://www.facebook.com/amdanrazip/" target="_blank"><img alt=" Follow Me" src="https://blogger.googleusercontent.com/img/b/R29vZ2xl/AVvXsEgqBs7f26_4sIhSSy6QNvCwUEZvY0qq1aPRToajSCGbbTAKWy2-CIOcY3gMUgSVeV4PJou7237DH_e483w1EqHkzE27LtPvD0yImjXDT_l0bNe4WS5HACf2MD4FqWxH5CuPvIhaLZg6NXaQ/s1600/Facebook.png" style="width:50px;height:50px" /></a></td>
*nama id perlu ditukar
anda juga boleh follow saya di facebook untuk mengikuti perkembangan saya 
                         link facebook ini memudahkan anda untuk terus ke facebook saya


twitter DI BLOG

1.Login ke Blogspot, clik Layout > Add a Gadget (Sidebar)  >  HTML/JavaScript 

2. Copy code di bawah dan paste ke dalam Html/Java Script
<a href="https://twitter.com/amdanrazip" target="_blank"><img alt=" Follow Me" src="https://blogger.googleusercontent.com/img/b/R29vZ2xl/AVvXsEhAr09Nyy1bek79DV3Y8-HBOQPtiMRePulMQRV8lXEjIS4mITKjBxf8zRzl1Hhvi_SvFPLyMhbECVg6nNVNJlxTOJnTwaaxJ2sJxA6cJNMVzKZP4tU1BJEhZRh9unvwHjsVePYShTPuvQGp/s1600/Twitter.png" style="width:50px;height:50px" /></a></td><td
*nama id perlu ditukar
anda juga boleh follow saya di facebook untuk mengikuti perkembangan saya 
                         link facebook ini memudahkan anda untuk terus ke facebook saya


tambah lagu DI BLOG

1. pergi ke link ini https://soundcloud.com/

2. pilih lagu 

3. kemudian copy link lagu tersebut 


4. pergi ke layout kemudian pilih add a gadget dan pilih html dan akhir sekali paste link
aplikasi ini berfungsi supaya membaca dapat mendengar lagu sambil membaca blog saya 


Related Posts Plugin for WordPress, Blogger...